Build it and they will come, right?
Well what happens if the software, app, website, etc. you’ve spent all that time and money building is a nightmare to navigate?
How do you avoid sinking a ton of cash into a user experience that just doesn’t keep people around?
Rapid prototyping based on your sitemap design.
Wait, but what is rapid prototyping?
It’s without question one of the most important elements of any design process or product development and it’s what gives you the confidence that your product, site or application works as intended before you invest energy and capital into actually bringing it fully to life.
What is rapid prototyping in UX & UI design software? Our definition
In a nutshell, it’s creating incremental iterations of whatever it is you’re building, then testing those successive versions with real users in order to quickly uncover and fix any issues that are detected, ultimately getting you closer and closer to that pixel-perfect final design.
It mirrors, and goes hand in hand, with the process of developing a minimum viable product: build-measure-iterate.
Rapid UI prototyping can uncover the areas that need improvement as well as reveal true user needs and getting that interface right is critical.
Why?
An analysis of 8 billion (with a “b”) app installs over a 7 month period in 2018 showed that apps get deleted just 5.8 days after their last use.
If your interface and design is lacking in even the slightest way, your competitors are going to eat your lunch.
Quick prototyping can keep your app from ending up among those in the dustbin.
And rapid UX prototyping ensures that the sleek user experience you dreamed up ends up being just as smooth as how you envisioned it.
Think of it as usability testing to hone your concept models and the best prototyping tools make it a breeze.
🎬 Learn what Slickplan can do!
We filmed a short video to show you exactly how to use Slickplan
What are the different types of rapid prototyping methods?
From assisting in the manufacturing process to fabrication to the digital space, prototyping is how you go about sharpening your overall design and it’s broken down into two main kinds; high fidelity and low fidelity.

In the world of digital products, you’ll find savvy companies in every industry doing rapid prototyping work on their sites and apps – both for internet and mobile – because money doesn’t grow on trees and getting it right the first time matters for retention.
The cycle of prototyping can be broken down into these steps:
- Build what you plan to test
- Give it to the wolves, i.e., your team, key stakeholders and/or test users
- Analyze and implement their feedback
- Repeat until the user interface design is where you want it
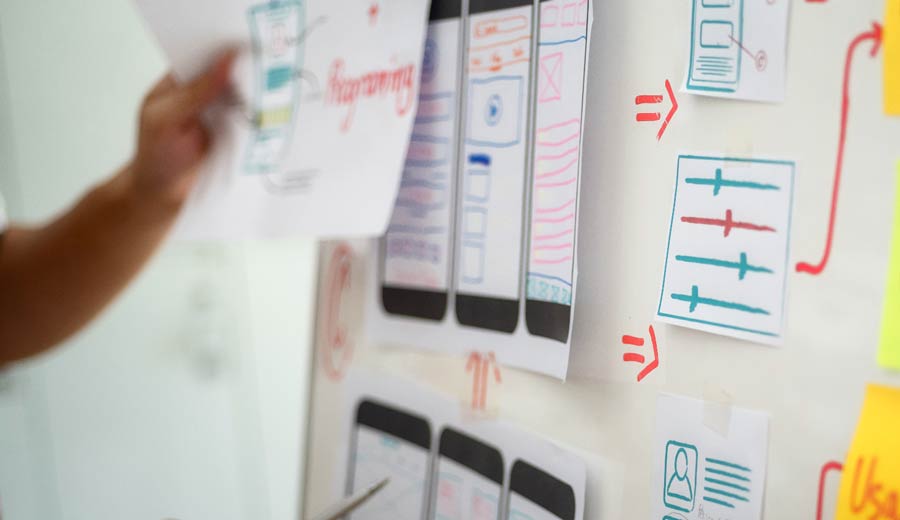
Low fidelity prototyping
A low fidelity prototype doesn’t have to be a version that even remotely resembles a ready-made application and is meant to be used early in the design process.
To save time and money, a piece of paper and a pencil are more than enough to present ideas. You’re looking to quickly sketch (literally) the main functionalities of your app or site and simulate how it works with sketches of your proposed screens along with cut-out elements.
Pro-tip: use stencils to keep sizing consistent and to make sure elements fit for the devices you’re building for.
It’s essentially grown-up arts and crafts that encourages you to look at the basics of each layer and how they interact so don’t worry about the real content for now, that comes later, just drop in some dummy text where needed.
This is rudimentary work that’s meant to validate your good ideas and, perhaps more importantly, invalidate your bad ones as fast as possible.
There’s no need to focus on the visual aspect of the product at this point, basic drawing skills are plenty. What’s more critical here is to remain open to the new ideas that pop during this ideation. If you want to get your creative juices flowing at this stage, try crazy 8s – an exercise practiced during design sprints. Paper prototyping, despite its many benefits, remains a poor substitute for a real product and it relies heavily on the user’s imagination.
After the main functions and features of the digital product have been identified, the best ideas can be transferred to low-complexity UX wireframes that’ll bring you that little bit closer to the final version of the user interface. Wireframes serve as the ‘skeleton’ of the product, key elements in the visual hierarchy, without focusing on the appearance.

It’s worth remembering at this stage, wireframes are still part of the rapid prototyping process, call it medium fidelity, so don’t spend huge amounts of time polishing them.
To get a better idea of when to use which, we’ve put together a wireframe vs prototype breakdown to help you out.
Again, the recipe for a successful product is; prototype, test, refine, iterate. Speed is a factor in these early stages so consider utilizing templates to keep things moving.
High fidelity prototyping
With the feedback and user requirements picked up in the low fidelity stages you can finally create a genuine high fidelity prototype.
Here’s where you get rid of the paper and pencil and make a functional version of what you’re developing. The basic user interactions should be in place, buttons will be clickable in the places that you’d like to test, menus are there, etc.

In other words, it should look, feel and function like the final product and include user interface elements like the general layout, logos, fonts, colors, animations and whatever else your site or app may include.
Given the level of detail and how interactive you need it to be to get additional feedback, a high fidelity prototype isn’t whipped up in an afternoon because you’re looking to give your test users a realistic iteration to assess at this stage of the game.
As with low fidelity prototyping, there’s no real limit to the amount of rounds you can do but don’t let perfection get in the way of good enough because the goal is to get this thing to market.
Rapid Prototyping advantages and disadvantages
Given the descriptions, you can already tell there’s quite a bit of upside to fast prototyping, here we’ll look at some of those pros as well as the cons.
What are the advantages of rapid prototyping design?
- Find and fix issues before they’re baked into the code
- Confirms viability of user journey
- Iteration encourages collaboration and unleashes creativity
- User involvement means solutions are user-focused
- The final design is more user-oriented
- Reduces costs and lowers risk
On the flipside, with the good comes some bad.
What are the disadvantages of rapid prototyping design?
- Takes time and time=money (however, the money you spend on rapid prototyping pales in comparison to the cost of fixing issues after you’ve launched)
- Low-fidelity prototyping with paper and pencil asks a lot of users and leaves a lot more to the imagination – perhaps too much
- Some elements or features that users liked in early prototypes may not make it to the final version
- Designers and developers can grow attached to ideas
- Users may think they’re seeing the final iteration despite being told otherwise
The top 10 best rapid prototyping software
These days, there’s prototyping tools available but before deciding which to use, ponder these questions:
- How complex and close to the final product do you want the prototype to be?
- Will you be working on the prototype alone or with a design team?
- How will it be presented to the users?
Below are some useful options and explanations of what they’re best for. Remember to always choose the best method and the right fidelity for your specific needs.
 1. Balsamiq
This is a tool for rapid prototyping only. With Balsamiq you can create low fidelity rough sketches, resembling freehand drawings. There are over 500 icons and many basic pre-built items available in the tool’s library. Balsamiq allows you to add basic interactions and share the prototype with the team. It does not offer collaboration options, so it is not possible to work on the prototype with the design team at the same time.
Website: https://balsamiq.com
Platform: Windows, Mac
Price: starts from $9/month
 2. Axure RP
This is one of the oldest prototyping tools and sooner or later you’ll probably come across it. It’s perhaps the most extensive prototyping tool that allows you to create complex interactions and logical conditions. Axure is extremely powerful and allows you to make a high fidelity prototype that’s very similar to the final product. There are downsides to the complexity and sophistication level, though; the learning curve can be quite steep if you want to learn all the interactions and conditions.
Website: https://www.axure.com
Platform: Windows, Mac
Price: starts from $ 29/month
 3. UXPin
Similar to Axure RP, UXPin is an extremely robust tool that can carry you through the entirety of the UX/UI design process. Of course that means this is a tougher one to learn and is very much not geared towards beginners. That said, once you and your team learn it, the upside is huge. You can create high fidelity prototypes nearly identical to your final product or import from Sketch, collaborate across the team and do your user testing all in one place.
Website: https://www.uxpin.com
Platform: Windows, Mac
Pricing: Starts at $19/month
 4. Invision
Used together with another tool, e.g. Sketch, Invision is a popular option. You can use it for free (with limitations to the number of projects) and it allows for seamless collaboration with the team. It’s also a convenient tool for collecting feedback from users.
Screen views (in the form of .png, .jpg or .psd files) are uploaded then hotspots are added to them to which interactions are attached. This quickly generates a simple interactive prototype. One important caveat, Invision is a web application so it requires internet access.
Website: https://www.invisionapp.com
Platform: Web
Price: There is a free version
 5. Adobe XD
The youngest of the Adobe tools, XD came out in 2017 and works perfectly with the entire family of Adobe products. The undoubted advantage of XD is that it works on both Mac and Windows. You can use it to create interactions, transitions and other types of dynamic functionality in addition to gathering feedback (commenting options) and testing your prototypes on mobile devices. Adobe XD is vector-based, so scaling and resizing of elements is very easy.
Website: https://www.adobe.com/products/xd.html
Platform: Windows, Mac
Price: There is a free version
 6. Wireframe.cc
As the name suggests, Wireframe.cc is specifically for wireframes and has simplicity at its core, very much the definition of rapid web prototyping. The interface may be stripped down, but this is a rather powerful online app that allows you to intuitively build, annotate and share low-fidelity prototypes.
Website: https://wireframe.cc
Platform: Web
Price: $16.99/month but there is a free version
 7. Figma
Although it is more of an application for creating designs, there are built-in transition functions that can be additionally styled (e.g. with the type of animation), so it works well with simple prototypes. It’s a web app but you can work on files offline as well. Figma works on both Windows and Mac and continues to gain in popularity. Arguably the best thing about Figma is the strong collaboration features; the whole product team can work on the prototype in real-time. If you’ve worked with Sketch before, you’ll find that Figma is quite similar in many ways. Moreover, there are also several plugins that can make your work easier.
Website: https://www.figma.com
Platform: Windows, Mac
Price: There is a free version
 8. Framer
An incredibly versatile tool that can take you from wireframes all through to your high fidelity prototype. Iterate with ease, build out your user flows, add animation and lock in your look with a massive component library. All without coding anything.
Website: https://www.framer.com
Platform: Windows, Mac
Price: $20/month but there is a free version
 9. Sketch
This tool is basically an industry standard and there’s a reason why countless UX designers love it. Just like Figma, it has a hotspot feature so you can easily combine screens using transitions. It’s probably more popular to use a Sketch wireframe in combination with other prototyping tools such as Invision to create your prototypes. One of the few negatives is that Sketch is a Mac-only.
Website: https://www.sketch.com
Platform: Mac
Price: $99
 10. Origami Studio
This tool was created by Facebook designers for their own use but they later shared it with the whole design community because it turns out it was pretty stellar. For designers who need a more advanced tool, this might be a great choice for prototyping your websites and mobile apps. Unlike the other options mentioned before, Origami uses a patch editor that lets you build logic, behaviors, animations, and interactions. You don’t need to create it from scratch as there are many prebuilt patches, out of which you only need about 15–20 to cover all your prototype needs. Just like Axure, this tool is on the more complex side and has a bit of a learning curve.
Website: https://origami.design
Platform: Mac
Price: Free


Think visually. Improve UX with Slickplan
Build intuitive user flows, stronger customer journeys and improve information architecture.
Remember, focus on the rapid prototyping process!
Prototype technology has come such a long way and It’s difficult to create the ultimate list of the best prototyping tools since it all depends on the context of your project.
Truth is, once you give one of them a try you’ll begin to see similarities across the board. As critical as it is to choose the right tools and know them well, you can usually learn how to use the simpler ones in just a couple of hours.
That’s why you’ll hear designers say it’s not the tool that matters most in prototyping, but the set of best practices behind it; how you ideate the functionalities you want to test and how you collect feedback.
The iterative approach of the RP process allows you to escape the trap of being stuck on the very first idea you have and encourages designers and developers working together to be even more agile in pursuit of what works best. Ultimately the tools are a conduit for bringing your ideas to life and the way to get the most out of any of them is to focus on learning the design techniques themselves.
Check out this free Udacity course created in cooperation with Google that goes beyond “what is rapid prototyping?” and walks you through the iterative process or give this free e-book from UXPin a read.
After that, grab some paper, pencils and sharpies and get to prototyping.


 X
X