Building a decision tree can be the foundation for any situation where the options seem endless. Fortunately, learning how to make a decision tree is a simple and straightforward process that anyone can take advantage of. So, if you have a choice to make or an idea to think through and share with people, all while showing the process that got you there, then this is the tool for you.
Here’s how to make a decision tree
Before we discuss how to construct a decision tree, let’s define what a decision tree even is.
It’s a diagram that shows the thought process and possible outcomes of a question or idea to allow for the best option to be determined and selected. It’s a great decision-making strategy to answer every question and work out ideas before making attempts at bringing them to life.
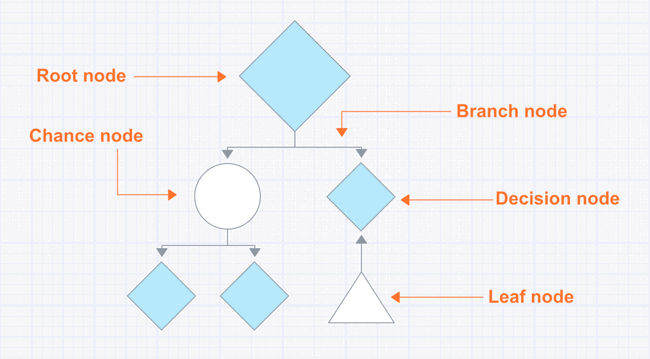
A few quick features to learn about your tree. Nodes indicate landing points of data derived for your chosen attributes (the resulting questions/answers/ideas). A branch node represents the connecting lines to the next symbols in the process. Leaf nodes mean a decision or endpoint. Trees are built by selecting attributes that best split the data into subsets.

Next, open up your flowchart software and let’s go through the five steps of creating a tree design.
1. Define an idea or pose a question

Starting off with a blank decision tree, you need to have a question or an idea. This question or idea will live in a square box, known as a root node. Decision nodes, of course, show when a decision needs to be made followed by connecting branch nodes or lines to what the options are for that decision.
This is the base of any decision tree structure. Without it, there’s nothing to analyze.
As we go on, keeping things in decision tree format (like in this step-by-step) should be a high priority. Decision tree symbols are universal and don’t change meaning from tree to tree. Therefore it’s critical to know them well so you can build a decision tree that’s easily understood by all when shared.
Don’t worry though, you don’t have to memorize them, we put together a flowchart decision symbol guide that you can use as a cheat sheet.
2. Research, analyze and determine possible options

Depending on the decision you need to make, some research and analysis might be necessary. If this is a decision on something you’re familiar with, it could be as simple as writing out what the possibilities are as they come to mind.
More complex issues naturally require more research. Write down what the possibilities are at the ends of the branches.
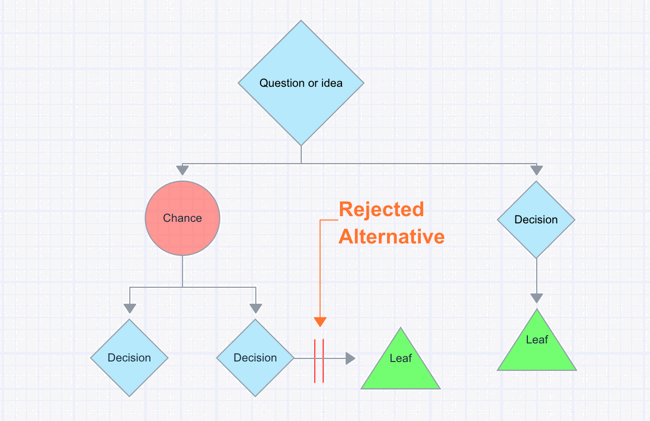
After the initial root node, you’ll add chance nodes (circles) or decision nodes (squares). These are the resulting possibilities of the question or idea you’re working on.
Remember, as you go along, you need to add branch nodes. More on that next.
There is no right or wrong answer in terms of how many possibilities there can be. It may be two, it may be 5. If it’s down to yes or no, of course, you’ll only have two nodes. If the outcomes are more complex, there will be more.
3. Extend and expand on those ideas
If you have more choices to make, things to decide, or just feel unsure, you probably need more data. This is the step where you’ll be adding that.
Connecting root/decision nodes to chance and decision nodes with branch lines is necessary because it shows where to go next in the thought process. But at this point, it’s good to stop and look over everything you’ve done so far.
Are the initial options all of the options? Do you need to add more?
The parts of a decision tree that need more information should be filled in before continuing because this will directly affect the outcome or end result. Both simple and complex decision trees require all avenues to be explored to get the most accurate result.
These ideas may not immediately go straight to the next step where you’ll determine risk and reward. They may offer up more questions and decision points that need to be added. That’s a good thing. The more questions or possibilities, the more thought out the original idea or question will be. Eventually yes, you’ll need to make some decisions, but don’t be afraid to explore. You’ll be thankful you did when you come to a conclusion that you’re confident with and you can go back and view your train of thought. This is one of the major benefits of using decision trees.
Another quick note: striking out branch nodes with double lines (perpendicular lines to be precise), referred to as the rejected alternative, indicates you’ve decided against what that branch node leads to.

4. Determine risk and reward
Now that the ideas are flowing and more data is available, it’s time to determine risk and reward probability.
Risk and reward are displayed in percentages. Unless you’re a programming wizard and have harnessed the power of AI, then you need to determine the probabilities manually.
Some situations are easier to calculate than others with little internal thought. We do this every day in our heads. Will I get fired if I call off today? Can I make it to the next exit before getting gas?
The more complicated questions should be looked into more deeply before slapping numbers down. That’s where your prior research helps.

5. Evaluate the data
At this time, you should be wrapping up on possibilities and analyzing the outcomes. It never hurts to go back over everything and make sure everything connects and all possible avenues have been explored.
Failing to do so could leave out a potential outcome that could change the course of your final decision.
Leaf nodes, represented by a triangle with the tip pointing towards and attached to the branch node containing the percentage/probability, are the endpoint on your decision tree.
Leaf nodes will never split into further nodes. They’re the end of the line. They show that there is no more data to be added and final decisions are becoming clear. Evaluate the available data outcomes and extract from it what you need based on the purpose of your decision tree.
If it’s a question, look for a final answer. If it’s an idea, look for a conclusion via confirmation that it’ll work and what to do next.
Important: you may not always use a percentage-based system. This is directly determined by what’s being decided. But if you can — add a percentage, do so.
🎬 Learn what Slickplan can do!
We filmed a short video to show you exactly how to use Slickplan
Who should use decision-making charts?
Truly anyone can use this decision tree process. UI/UX/developers, lawyers, business owners and leaders, students of all levels, designers and much more.
And what is a decision tree useful for? The simple answer: anything with a question. If a choice needs to be made, options evaluated or in exercises like concept development where ideas are being validated, a decision tree is your new best friend.
Determining how to use a decision tree map comes down to what you want to learn from it. This can include the use of specific symbols rather than others and whether you’re asking a question or stating an idea.
Tips on how to make decision tree diagrams work harder for you
Building a decision tree flowchart is a relatively simple process, but you can make it even easier with our decision tree template. Use this to get the ball rolling on making more informed choices and knowing you’ve got all the options in front of you.
Using our decision-making tree example is just one way to get the job done so don’t be afraid to get creative. You may notice the template has no chance nodes or circles. That’s ok! Each decision will have different needs so familiarizing yourself with the various shapes you can use will be a big help.
How to draw a decision tree diagram for image export

Creating an infographic decision tree design in Slickplan is easy. When you draw decision trees using our online diagram creator, exporting takes just a few clicks.
Start by clicking export, selecting "image", and choosing from PNG or vector. After clicking export, a file will be downloaded to your computer and can be used anywhere you need it.
How to create decision tree PDFs

Turning a decision flow diagram into a PDF is just as easy. Whether you’ve produced a marketing decision tree or one for calculating the risk and reward for a new product, a PDF is a great way to display your work and present it to others.
Similar to image exports, creating decision tree PDFs starts by clicking export at the top right side of your screen, selecting PDF along with the available options. Hit export and the file is immediately downloaded.
Think visually. Improve UX with Slickplan
Build intuitive user flows, stronger customer journeys and improve information architecture.
Start creating a decision tree diagram now!
Start learning how to build a decision tree with Slickplan as your guide. Using the lessons in this article, you can quickly and easily put together a perfect decision diagram that can be shared with everyone on the team. You’ll find it’s a great tool to show your process and illustrate every thought in a way that anyone can understand. Get started with Slickplan’s free 14-day trial and try the Diagram Maker today!


 X
X
![What is a decision tree? [Practical examples & use cases 2026]](https://cdn-proxy.slickplan.com/wp-content/uploads/2023/08/Decision_tree_cover-570x190.png)
